How to Configure a Full Wall Storage Unit
Step-by-step guide for creating a complete storage wall using wardrobes, wall-mounted cabinets, and fillers. Measurements, layout options, material coordination, and 3D preview.
A full wall storage unit is the dream of anyone who wants maximum order in a room. Instead of isolated furniture pieces with gaps between them, a storage wall covers the entire surface — from floor to ceiling, from corner to corner — providing the maximum possible amount of storage space. At Téchne, you can configure such a wall by combining wardrobes, wall-mounted cabinets, and extra panels (fillers) into a unified ensemble.
The Concept: What a Full Storage Wall Means
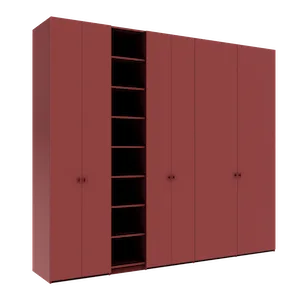
A storage wall is not a single large wardrobe — it is a system of individually configured modular elements that look and function as a single piece of furniture. This system can include:
- The base wardrobe — the main body, from the floor, covering most of the wall. Contains clothing rails, shelves, interior drawers, and everything you need for storage
- Wall-mounted cabinets above — mounted on the wall above the wardrobe or in areas where the wardrobe does not reach (above the door, above the window)
- Side fillers — narrow panels that fill the gap between the last wardrobe column and the side wall, eliminating visible gaps
- Decorative panels — cover the visible sides of cabinets, creating a clean, finished appearance
- Top panel extensions — extend the wardrobe top panel to the wall or over fillers
Step 1: Measure the Wall Precisely
Measurement precision is the foundation of a successful storage wall. Here is what to measure (detailed measurement guide):
Width
- Measure the wall width at three points: at floor level, at 120 cm height, and at ceiling. Use the smallest value as reference (the wall may be slightly convergent)
- Note the exact positions of obstacles: power outlets, switches, TV/internet sockets, radiators
- If the wall has irregular corners or niches, measure each segment individually
Height
- Measure from the finished floor (laminate/parquet, not screed) to the ceiling
- Check if the ceiling is perfectly level — in old apartment blocks, the difference between corners can be 1-3 cm
- If you have ceiling beams, also measure their position and size (ceiling beam guide)
Available depth
- Check if you have 60 cm free perpendicular to the wall (standard depth for wardrobe with clothing rail)
- If space is limited, you can opt for 45 cm depth (sufficient for shelves and drawers, without front-facing clothing rail)
- Account for hinged door opening — requires ~50 cm clear space in front
Critical obstacles: outlets and switches
Power outlets and light switches are the most common obstacle for a full storage wall. Your options:
- Relocate the outlet — an electrician can move the outlet inside the wardrobe (useful for vacuum cleaner) or to another area of the room. The cost is small compared to the benefit
- Cut the back panel — the HDF or back panel can be cut to allow outlet access from inside the wardrobe
- Leave a gap — configure the wardrobe so that an open compartment (no door) is exactly at the outlet location
Step 2: Choose the Optimal Layout
There are two main approaches for a storage wall:
Option A: Base wardrobe + wall-mounted cabinets above
This is the most versatile approach. The base wardrobe is 200-220 cm tall, with wall-mounted cabinets above reaching the ceiling.
Advantages:
- The wardrobe top surface can be used decoratively (plants, objects)
- Wall-mounted cabinets can have different depth from the wardrobe — for example, 35 cm deep above vs. 60 cm below
- Assembly is simpler — the wardrobe is installed independently, then the wall-mounted cabinets
- Easier access to items above (wall-mounted cabinets have their own doors)
Disadvantages:
- Visible horizontal line between wardrobe and wall-mounted cabinets
- Requires solid wall anchoring for the wall-mounted cabinets
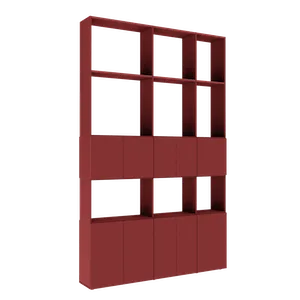
Option B: Single floor-to-ceiling unit
A single wardrobe configured at the room's maximum height — for example, 260 cm.
Advantages:
- Monolithic appearance, no separation lines
- Unified structure provides maximum rigidity
- A single configuration act and a single order
Disadvantages:
- The upper zone (above 200 cm) is difficult to access daily — requires a step stool or chair
- 260 cm panels are heavy and require two people for assembly
- Depth is uniform across the entire height
Step 3: Configure Elements in the Téchne Configurator
The Téchne configurator allows millimeter precision for each element. Here is the recommended workflow:
3.1 Configure the main wardrobe
- Open the wardrobe configurator
- Set width — if the wall is 320 cm and you want 2 cm fillers on each side, set the wardrobe to 316 cm
- Set height — either to ceiling (for option B) or 200-220 cm (for option A)
- Configure columns — distribute the width into 5-7 columns, each with a specific function (long rail, short rail + shelves, drawers, open shelves)
- Choose carcass and front materials
- Add extra panels if needed — side fillers, decorative side panel
3.2 Configure wall-mounted cabinets (if choosing option A)
- Open the wall-mounted cabinet configurator
- Set width identical to the base wardrobe (or in segments, if there are obstacles above)
- Set height — the difference between wardrobe height and ceiling, minus 1-2 cm technical clearance
- Choose the same materials as the base wardrobe — for a unified look
Step 4: Fillers and Extra Panels
Fillers are narrow panels (typically 2-10 cm wide) that fill the gap between wardrobe and wall. They are essential for a professional look:
- Side fillers — cover the distance between the wardrobe side and the room's side wall. Without them, a visible gap remains where dust and small objects accumulate
- Compensation fillers — if the wall is not perfectly straight, a wider filler on one side compensates for the difference
- Transition fillers — if combining wardrobe + wall-mounted cabinet with different depths, a transition filler ensures visual continuity
All fillers are configured in the same materials and colors as the rest of the furniture — for a uniform appearance, as if everything were a single piece.
Step 5: Material Coordination
The unified appearance of a storage wall critically depends on perfect material coordination between all elements:
- Same carcass color — wardrobe, wall-mounted cabinets, and fillers must be the same chipboard decor. Even similar shades (White W1100 vs. White W980) appear different when side by side
- Same fronts — doors on all elements must be the same material and color. If you choose painted MDF RAL 7016 (anthracite grey) for the wardrobe, use the same color for wall-mounted cabinets
- Same handles — handle type and finish must be identical across the entire wall
- Texture direction — for decors with visible texture (oak, walnut), ensure grain direction is consistent — vertical on doors, horizontal on wardrobe tops
3D Preview and Dimensional Precision
The Téchne configurator offers real-time 3D preview for each configured element. You can rotate the model, verify dimensions, see how chosen materials look, and identify any issues before placing the order.
Dimensional precision is a critical advantage of custom furniture: every piece is CNC-cut to the millimeter, and fillers compensate for any difference between wardrobe dimensions and actual wall dimensions. The result is a storage wall that looks integrated into the room's architecture, not added afterwards.
Additionally, column and shelf positions are completely free — you can place a shelf at any height, make columns of any width (within structural limits), and combine open storage zones with closed ones, exactly as needed.
Practical Storage Wall Examples
Bedroom — 300 cm wall
- Wardrobe 296 cm x 240 cm x 60 cm, floor to ceiling
- 6 columns: 2 with long clothing rail, 2 with short rail + shelves, 1 with interior drawers, 1 with shelves
- 2 cm side fillers on each side
- Hinged doors with mirror on the 2 central columns
- Material: Halifax Oak + painted MDF anthracite grey fronts
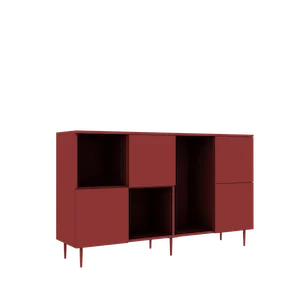
Living room — 360 cm TV wall
- TV sideboard 200 cm x 45 cm x 45 cm, centered
- Side wardrobes (left + right) at 80 cm x 220 cm x 45 cm each
- Wall-mounted cabinets above TV sideboard, 200 cm x 40 cm x 35 cm
- Compensation fillers between elements
- Coordinated material: white on the entire wall, wood accent on sideboard
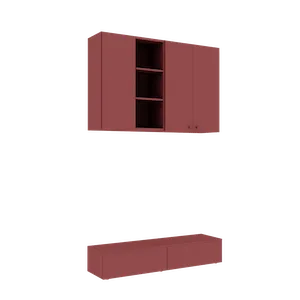
Hallway — 250 cm wall with entrance door on the side
- Wardrobe 200 cm x 260 cm x 45 cm (reduced depth for hallway)
- Wall-mounted cabinet above the door 50 cm x 40 cm x 35 cm
- Connecting filler between wardrobe and the cabinet above the door
- Hinged doors with mirror on wardrobe, hinged door on wall-mounted cabinet
Final Tips
- Plan access — large components must fit through the room door. Check door and corridor width before ordering 260+ cm panels
- Think long-term — a storage wall is a 10-20 year investment. Choose neutral materials that will not go out of style
- Start with the largest element — configure the main wardrobe first, then add complementary elements. It is easier to adjust small pieces than the large one
- Order samples — for a project of this scale, physical samples are mandatory (how to order samples)
A full storage wall transforms an ordinary room into an organized space, with every object in its place. With the Téchne configurator, you design everything online, see the price in real time, and receive furniture manufactured to the millimeter. The Téchne configurator ensures automatic validation of every component — dimensions, structure, materials — so the final result is always feasible and safe.
Start your storage wall project: Wardrobe configurator | Wall-mounted cabinet configurator After finalization, a human operator verifies your configuration before launching production.